
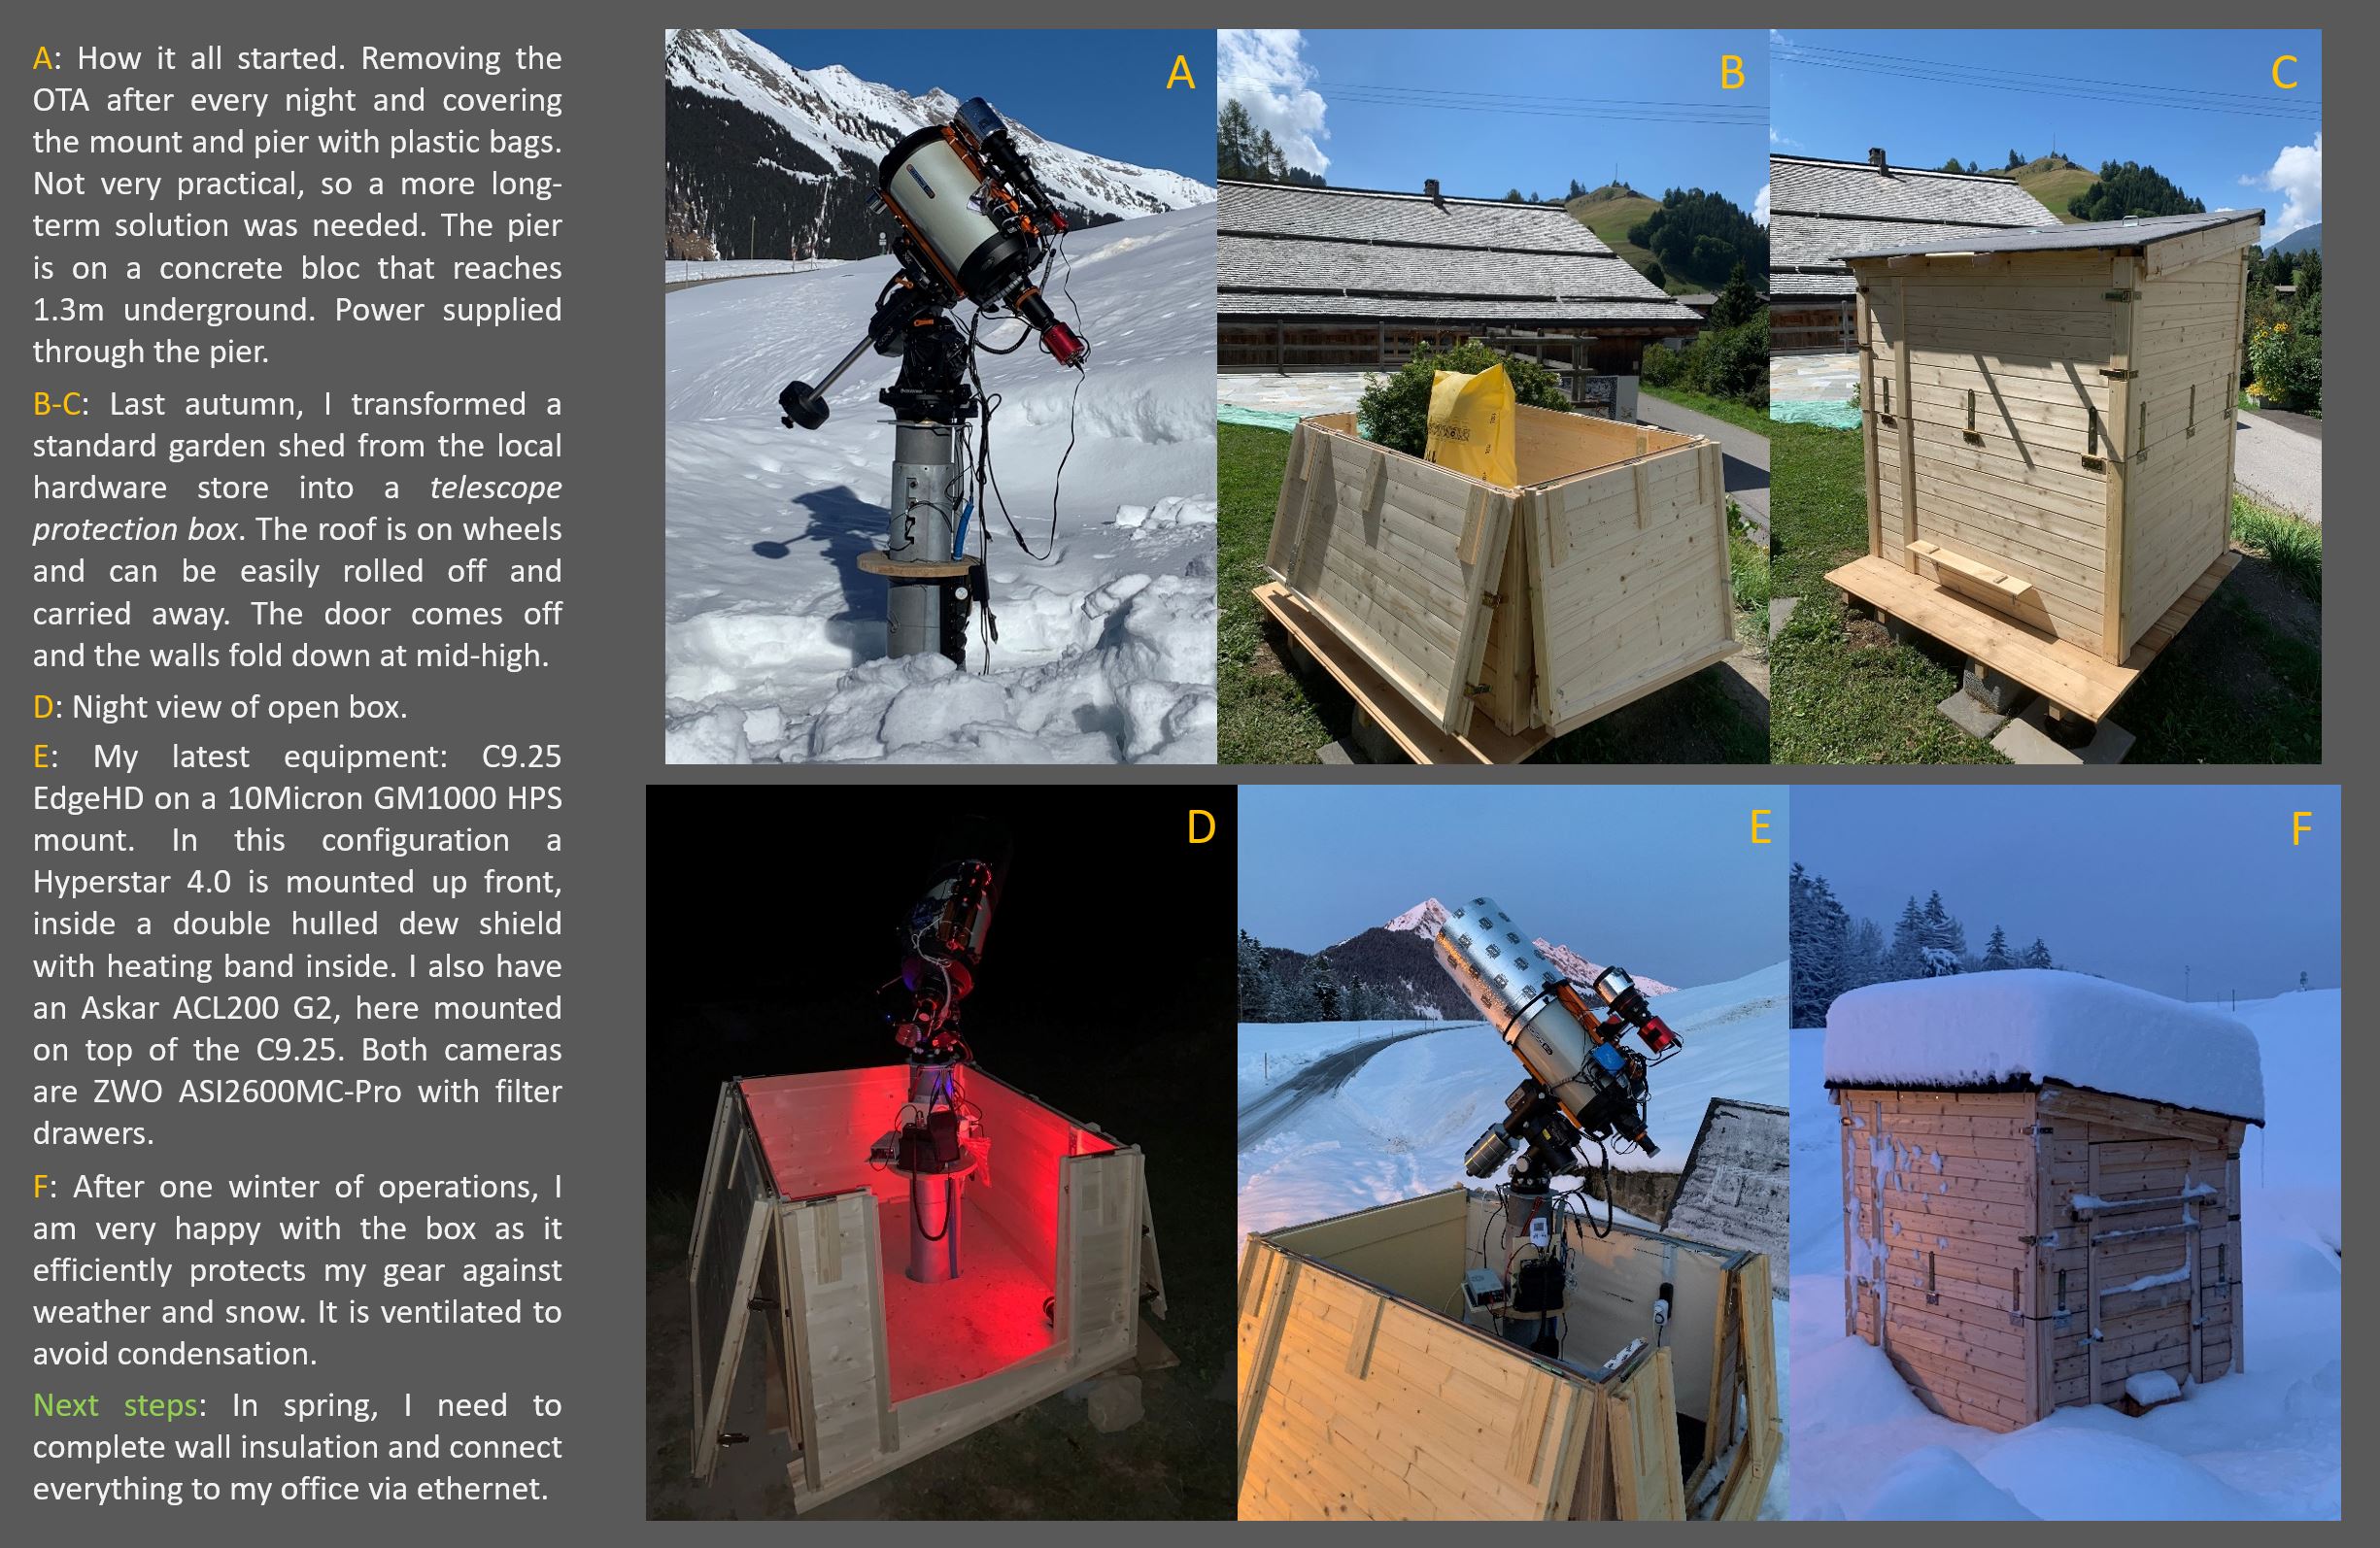
In 2022, I transformed a standard garden shed from the local hardware store into a telescope protection box. The roof is on wheels and can be easily rolled off and carried away. The door comes off and the walls fold down.
Summary
Download a pdf version of this post.
Here is a brief summary of how I built it.
Introduction:
I built my telescope protection box (TPB) by adapting a readily available garden shed to my needs. The objective was to build a TPB with a small footprint that fits local building regulations, has a roll-off roof that I could handle easily, and enough space to stow accessories. Some aspects of this adaptation are specific to my location, namely the need to resist to snowfall, an uneven terrain, and occasional strong winds from the south.
The garden shed:
I purchased a “Do-it-yourself” garden shed from www.Hornbach.ch, and had it delivered to my home:
| Document | Links |
| Online store art #8307212 | https://www.hornbach.ch/fr/p/remise-a-outils-alopex-medium-avec-plancher-120×180-cm-naturel/8307212/?searchTerm=8307212 |
| Technical document | https://media.hornbach.ch/hb/technicaldatasheet/as.47415886.pdf |
| Mounting instructions | https://media.hornbach.ch/hb/installationmanual/as.80298133.pdf |
These documents contain price as well as plans for the garden shed I used. They are available in French and German, but I would think they are easy to translate using google. Other sheds are available on the market, so this summery can be adapted to any available configuration.
Note: As my shed is not square, I aligned its long axis with the north-south direction. Obviously, before starting anything, it is important to know whether the shed one intends to acquire has sufficient room to hold the parked telescope on its pier. In my case, I park it with the counterweight bar in horizontal position. Thereby, I can minimize the height of the shed, which makes taking off (and putting back) the roof easier. The shed described above is fine for a scope like a C9.25 on a 10Micron GM1000 mount. There is also enough room for a piggyback scope mounted on the second Losmandy dovetail bar I have on my OTA.
Adaptations:
Several adaptations were made to the shed to suit my needs. They are listed below.
The Pier
My pier is a self-made metal tube (diam. 20cm) screwed to a 1.3m deep concrete bloc poured into the ground. [1] Power and Cat 7 network cable (far more reliable than Wi-Fi) come underground from the house through the centre of the pier. Power and network outlets are on the side of the Pier.
The floor
The floor is on a wooden platform made of larch planks designed for terrasses.[2] The planks are screwed to a structure of larch beams[3] that rest on concrete blocks[4]. This infrastructure must be properly levelled, and its long axis should be oriented North-South. The surface is cut to allow for the pier passing through.
The floor of the garden shed was cut to allow for the pier to pass through. Thereby the shed is never in contact with the pier. I covered the floor with some rubber mats, like those one would use in a garage.
Finally, I have anchored the whole structure to the ground using four ground screws[5], like the ones used for sunshades, but there are of course other ways to do so. I used the existing holes of the ground screws to bold them to the floor. This is a precaution to avoid the shed from being shifted by strong winds.
The roof and corresponding changes to the four walls
The roof is the most important change I made. I did not use the provided materials but purchased several pieces for that purpose. Given that I am parking my telescope with the counterweight bar in the horizontal position, I have measured the height needed for both the counterweight side and telescope side. To allow water to flow from the roof, I inclined the roof by about 20 degrees. On this basis I calculated the final roof surface and purchased the necessary beams, wood panelling and accessories as indicated below.
| Items | Specifications |
| Roof beams | 4 “beams” made of hardwood, with a section of approx. 3x4cm. Two with lengths equal to the narrow side of the roof (see below) and two longer by about 25-30cm as they serve as handles. |
| Broad side wall beams | 2 “beams” made of hardwood, with a section of 3x4cm. Length equal to the broad side walls. |
| Roof cover and metal handles |
Enough wood panelling to cover the roof surface (see below). Thickness 17-19mm. I used the bituminous waterproofing provided with the kit to cover the roof. If you are not exposed to heavy snow, then you can take the slimmest cover possible, as this reduces the overall weight of the roof. I added two metal hands on the roof to carry it to the side after rolling it off. Roof dimensions: The broad side of the roof = Broad side wall length + Wheel guide width + wheel guide cover thickness + 20cm (overhang). The narrow side of the roof = Narrow side wall upper edge lengtha + 20cm (overhang). |
| Wheels | I used these: Roulette fixe pour appareils de transport, jusqu’à 45 kg, 30 x 35 x 15 mm – HORNBACH. You’ll need 2. |
| Wheel guides | 2 “beams” made of hardwood (same as above). Each of the length of the roof’s narrow side upper edge a. |
| Wheel guide covers | 2 pieces of wood panelling, width about 9cm and thickness 17-19 mm. Each of the length of the roof’s narrow side upper edge (!This is longer than the wall length, by 1/cos(roof angle). |
I then cut the two narrow side walls of the shed to match that angle. One of those sides has the door, which I also cut. To ensure this is done well, I inserted the door in its destined position, fixed it in place, and cut the whole side in one go. If your shed has a door on the broad side wall, then it is easier, and the door opening can be used in full.
Once that is done, a wheel guide must be added the outside of both cut walls, parallel to the edge of the cut. The wheel guide is positioned in a way that its depth (Z in Fig. 1) corresponds to the wheel height minus about 4-5 mm. The wheel guide is then covered by the wheel guide cover to hide it from the outside. By rounding the end of the wheel guide, I ensured that the roof rolls smoothly and that it closes tightly when the wheels go slightly beyond the end of the wheel guide (Fig. 1, bottom left).
The roof itself is of course a bit broader and longer than the shed to ensure that there is a slight overhang (I have about 10 cm per side). Care must be taken to be precise when cutting the indentations in the broad side walls (Fig. 2) to ensure good roof closure. In fact, a couple of mm on each side of the beams suffice as room to push the rood into place. To support the roof, two beams are screwed to the walls and vertical beams of the walls (see figure 2).
To ease the process of taking the roof off, and putting it on, I attached two of L-shaped metal pieces (see image) to the underside of the left-most and right-most beams. These allow to “hang” the roof off the lower broad side wall, adjust its position to ensure the wheels are aligned with the wheel guides before lifting it with the handles and pushing it into place. You can also add two handles to the roof to lift it off and into place.
Figure 1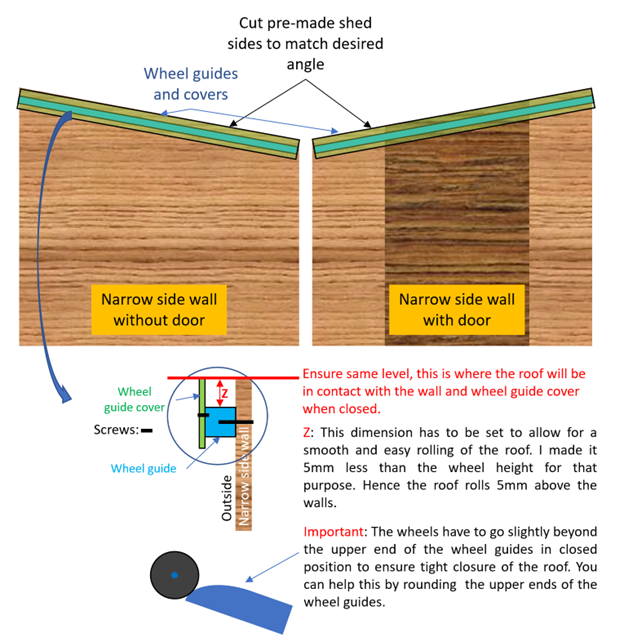
Figure 2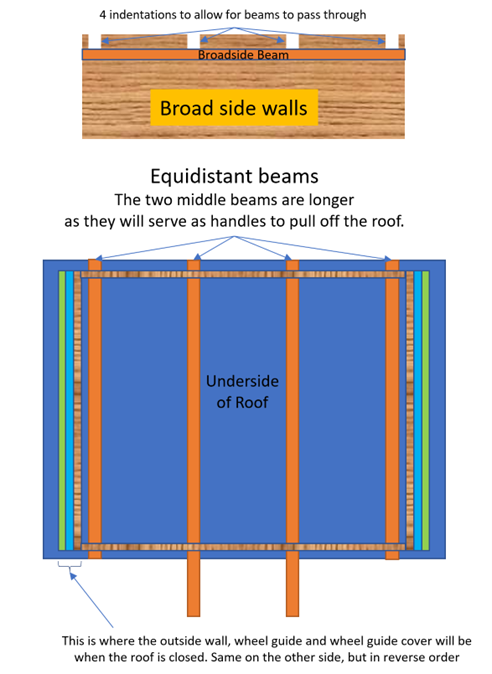
The walls
The four walls were cut about 1m above the floor and each upper half was attached to the lower half with three sturdy steel hinges (only two for the wall with the door)[6]. The lower halves of the walls were screwed together as described in the instructions, while the upper halves are free to fold. I further consolidated the lower halves with steel plates[7] and L-shaped plates[8], such as those shown in this example, to ensure they are sturdily screwed together and to the floor.
To close the box, and hence hold the upper halfs of the walls together at each corner, I use two box closing systems per corner, like the once in this example. They have to be rather sturdy, i.e. about 25mm wide.
The door
The door, after having been cut at the same angle as the narrow side wall it fits into, can be placed into the opening. I did not use any of the hinges supplied with the kit, but simply added another way to keep it closed, i.e. two transversal bars, each fitting into two holders screwed to the wall on either side of the door. The door can therefore be taken away before opening the box. Having a door is still useful to access the equipment when the box is closed.
Further considerations
I added a rubber band, like the ones used to ensure that windows are tight, to every hinge. This ensures that the TPB is tightly closed, except for the ventilation system describe below. Indeed, I would not want snow to be driven into the TPB under heavy winds. Furthermore, you may wish to add some “flaps” on the upper end of the roof to cover the beam ends. This will depend on the orientation of your major winds/weather.
I have later added internal insulation to dampen the temperature changes.
Condensation
To avoid condensation during wetter seasons, I have created two openings. One in the lower quarter of the door, covered outside by a small wooden structure open on the lower side and covered by some mosquito netting, and another one in the upper quarter of the opposite wall, into which I inserted a “bathroom ventilation fan”. Both openings have a diameter of 10cm. The fan (15W) runs intermittently on a humidity sensor (Ecodry DSH digitaler Hygrostat)[9]. So far I never had any condensation.
Paint
I have covered the floor inside and outside with a water-based translucent paint to keep the humidity out.
Electronics
Inside the TPB you have enough space to add 1 or 2 UPS (One for the mount and one for the computer/network switch) and place a cabinet with all your electronic gear, such as IP switch, computer, power supplies, etc..).
[1] It is important to note that none of the optical equipment is in any contact with the wooden structures as the Pier is screwed to a concrete block. This is important for stability.
[2] https://www.hornbach.ch/fr/p/lame-de-terrasse-en-bois-meleze-strie-lisse-28x145x4000-mm/6224074/
[3] https://www.hornbach.ch/fr/p/soubassement-en-meleze-45x70x2500-mm/6224077/?searchTerm=6224077
[4] https://www.hornbach.ch/fr/p/beton-pierre-de-fondation-22x22x17-cm/5853971/
[5] https://www.hornbach.ch/fr/p/douilles-a-visser-570-mm-galvanisees-a-chaud/3810264/?searchTerm=3810264
[6]https://www.hornbach.ch/fr/p/penture-droite-type-124-leger-200-x-33-mm-galvanise-passive-en-couche-epaisse/731544/
[7]https://www.hornbach.ch/fr/p/raccord-plat-135×55-mm-galvanise-sendzimir-1-unite/796496/
[8]https://www.hornbach.ch/fr/p/corniere-dangle-a-charge-lourde-avec-une-nervure-70x70x55-mm-galvanisee-sendzimir-1-unite/735820/
[9]E.g. from https://www.nettoshop.ch/
Hello, congratulations for this super idea. I would like to make something like that, I have only one question. How is with the wind? Because where I live, when there is wind from south could be very strong, about 60-70 km/h…
Many thanks,
Massimo
Hello Massimo,
I have not experienced any issues with wind. A few comments:
1. I have anchored the base to the ground using the ground screws as those shown here: https://www.hornbach.ch/fr/p/douilles-a-visser-570-mm-galvanisees-a-chaud/3810264/?searchTerm=3810264. This ensures that the whole structure is safe.
2. The winds can be very strong here in the valley, mostly from the south ( we call it foehn). Sometimes we have winds up to 100 Km/h. I never had issues with that. Of course I am not imaging on those nights;-).
3. Another consideration, on the basis of your specific location and winds (10-15 Km/h) during the nights you are imaging, you could consider having higher walls, and fold down only the top part thereof. That is not a problem where I am, hence I am folding the walls at about 50% of the height of the higher wall.
I hope this helps…
All the best
Manuel